

how to draw a lion head
The king of the jungle and African plains, the noble lion is one of the most fearsome creatures to roam the globe. Although deadly, these large cats are beautiful and remind many of their less ferocious household companions. Today, we have on the mighty lion past making the process of how to draw a lion easy for artists of whatsoever level. Nosotros take you through a step-by-footstep procedure to assist you create a realistic lion sketch.
Table of Content
- one How to Draw a King of beasts Easy Step-past-Step Tutorial
- 1.1 Pace i: Creating the Shape of the Main Torso
- 1.two Pace two: Starting the Lion Head Drawing
- 1.3 Pace iii: Planning the Lion'south Tail
- ane.4 Stride 4: Shaping the Back Legs
- one.five Pace 5: Constructing the Lion'due south Front end Legs
- 1.6 Step 6: Constructing the Details of the Panthera leo Head Drawing
- 1.seven Step 7: Outlining the Shape of the Ears
- 1.8 Step 8: Shaping the Panthera leo's Mane
- 1.9 Step 9: Creating the Concluding Outline of Your Lion Sketch
- one.10 Footstep 10: Shaping the Lion's Mane
- 1.11 Step 11: Adding Textural Item to Your Lion Sketch
- ane.12 Step 12: Calculation the First Glaze of Colour
- 1.thirteen Step 13: Creating Dimension with Shading and Highlights
- 1.14 Stride 14: Painting Details in the Mane
- 1.15 Step 15: Adding the Last Touches of Highlight
- 1.16 Footstep 15: Finishing Your Lion Drawing
- 2 Oft Asked Questions
- 2.1 Will This Tutorial Testify me How to Draw a Lion Confront?
- 2.2 Is It Difficult to Describe a Panthera leo?
How to Depict a Lion Easy Pace-by-Stride Tutorial
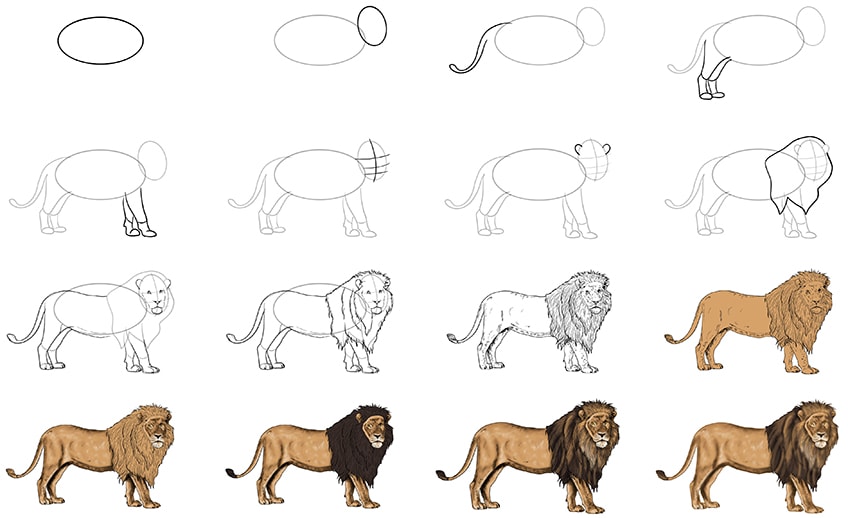
The most common question people enquire most how to draw a lion is quite simply, where to kickoff? With so many elements and then much detail, it can be overwhelming to put pen to newspaper. Nosotros brand answering this question very simple. All of our drawing tutorials begin with the employ of structure shapes and lines. Using basic lines and shapes to lay down the general shape of your cartoon before you begin adding intricate details helps y'all save fourth dimension and effort. In the collage below, you can come across an outline of all the steps in this king of beasts drawing tutorial.
The second most common question we get is what medium is best for the tutorial. Our answer to this question is just as straightforward; whatever medium you experience most comfy using.
We take designed this tutorial to be accessible for anybody, so whether you adopt to use coloring pens, acrylic paint, or a drawing tablet, we have you covered.
Stride 1: Creating the Shape of the Principal Trunk
To brainstorm your lion cartoon, create a large and elongated oval shape that lies horizontally on your canvas. Our superlative tip for this offset stride of your lion drawing is to identify the main torso oval in the very center of your canvas.
You as well want to make sure that at that place is enough of space on all sides of the main body where y'all are going to draw the limbs and caput.

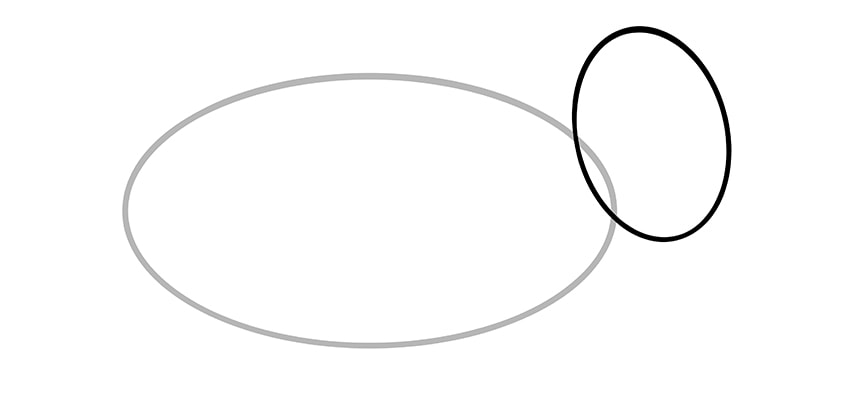
Pace two: Starting the King of beasts Head Drawing
Again, we are going to use an elongated oval shape to construct the shape of your panthera leo's head. The head structure oval should be significantly smaller than the main torso one.
You want the head oval to be almost vertical but slightly tilted to the left.
Step iii: Planning the Lion'southward Tail
To create the basic shape of the tail in your lion sketch, depict a curved shape that begins on the tiptop of the main body oval.

Step 4: Shaping the Dorsum Legs
Our lion appears to u.s.a. as if side-on, and so the 2 legs (one front end and one back) that are on the other side of the lion volition be partially obstructed. This difference in perspective is why structure lines can be and so useful. Begin by drawing the upper thigh of the lion's leg that is closest to us. One end of the curvy line should brainstorm at the bottom cease of the tail. Below this thigh, draw the lower role of the leg facing slightly forwards, so add an uneven oval to represent the foot.
For the second back leg, simply repeat these steps, but remember to keep the back half of the leg obstructed backside the other.

Step 5: Constructing the Lion'southward Front Legs
If you wait at the image beneath, you lot will see that the front legs of the lion are very dissimilar in shape from the back ones. Brainstorm by drawing the leg closest to you, drawing two slightly curved lines that extend frontward. Add together a separation line merely in a higher place the lesser of the leg and so add an uneven oval to correspond the paw of your lion sketch.
For the second leg, repeat this process but this one should extent straight down, and information technology should be partially obstructed by the other front end leg.

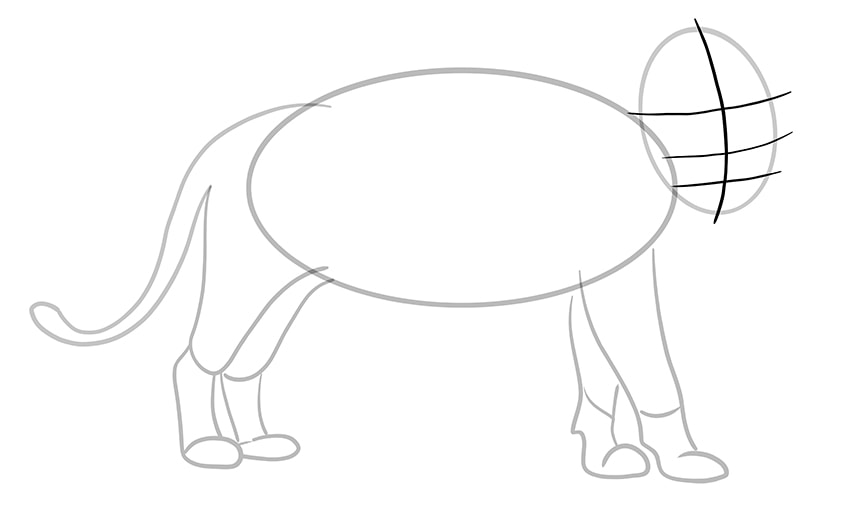
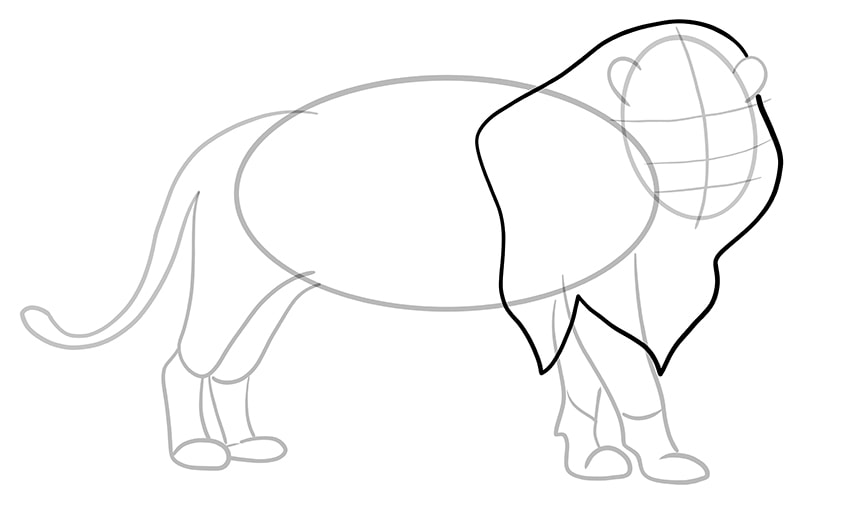
Step 6: Amalgam the Details of the Lion Head Drawing
In this step, you are going to utilise four lines to provide a base structure for the facial details. These lines will help you when y'all want to know how to describe a king of beasts face. Begin with a large vertical line that runs through the centre of the lion head cartoon and curves toward the front of the canvas. Side by side, draw three horizontal lines that curve towards the bottom of the canvas.
The two lesser lines which will assistance yous identify the nose and oral cavity should be closer together near the lesser of the caput oval.
Step 7: Outlining the Shape of the Ears
This footstep is very easy and quick. All y'all need to practise is identify an incomplete oval shape on either side of the head oval shape.
These 2 ears should sit higher up the top face construction line.

Step 8: Shaping the King of beasts's Mane
The lion'due south mane is very luscious and detailed. In this pace, we are simply going to create the outline of the mane with a single line.
Draw the mane shape around the head, flowing down towards the floor and covering a meaning part of the forelegs and master body oval.
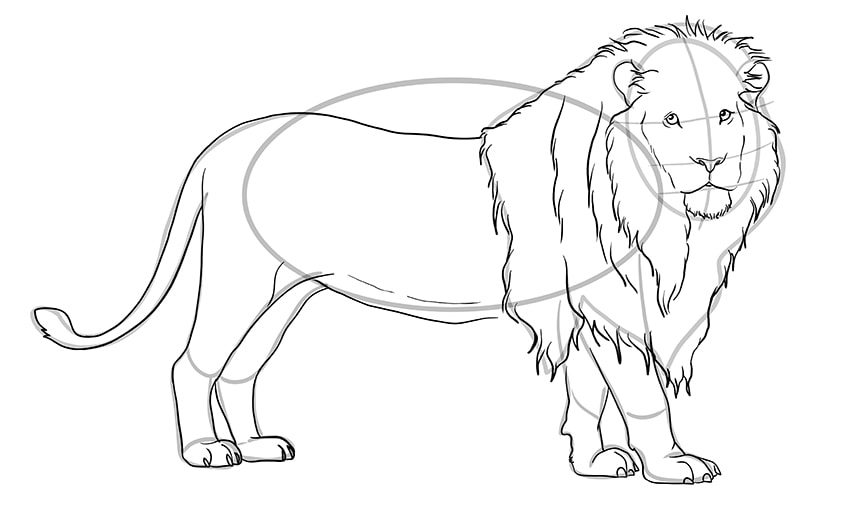
Step 9: Creating the Terminal Outline of Your Lion Sketch
Now that you have drawn all of your structure lines, it is time to put them to use to create the final outline of your lion drawing. Begin by outlining the ears and using the face construction lines to identify the features. On the top horizontal line, drawn eye on either side of the vertical line. On the middle horizontal line, depict the olfactory organ with the center running down the vertical construction line. On the bottom horizontal construction line, describe the mouth. Terminate the facial details by using short strokes to shape the outline of the lion'due south face and chin.
As you move down the body, exercise not outline the mane shape every bit we will do this in the side by side pace. You also practice not want to outline anything inside the mane shape, beginning your body outlines after it ends.
Curve the lion'due south back downwards and and then up to join the tail outline. You tin can outline the rest of the trunk by sticking fairly closely to the construction lines. When you go to the legs, use pocket-sized curved lines to create the toes of your king of beasts sketch, and add a small nail to each toe.

Step 10: Shaping the Lion'southward Mane
In this step, y'all are going to use the mane structure shape to help you create the final outline. When outlining the king of beasts'southward mane, you want to use short wavey strokes to create the impression of fur. Towards the bottom, you want to bring the mane to picayune points, that resemble flames. You want all of the lines to menstruation in the same downward management. Add additional lines and layers of fur within the broader mane shape.
When you accept completed this step and you are happy with your mane, you can erase any of the construction lines that are yet visible.
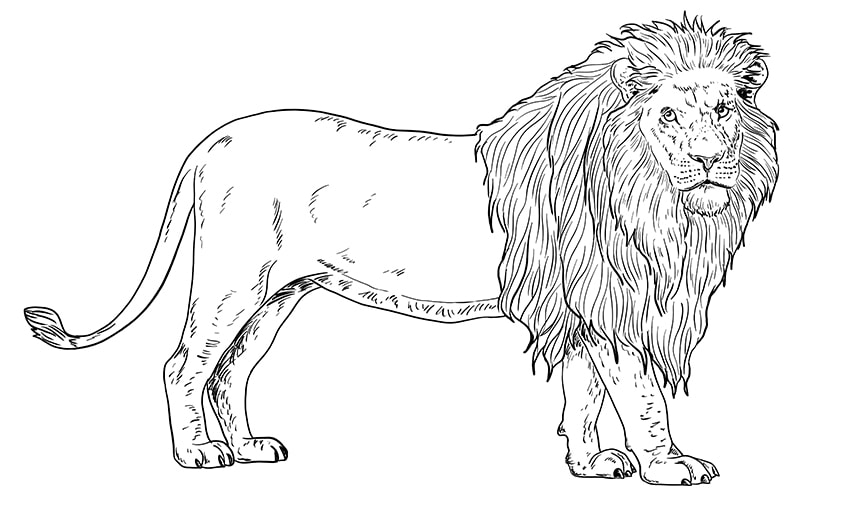
Pace 11: Calculation Textural Detail to Your King of beasts Sketch
Now comes the exciting stride in our "draw a lion" tutorial. In this step, you lot are going to utilise a range of short and long lines to create fur texture throughout the lion'due south trunk. Begin by giving texture to the mane by using long flowing lines. You want to brand certain that all of your lines follow the curve of the mane shape. On the face, use a combination of dots and short lines to add texture around the oral cavity, nose, optics, and ears. While you are hither, add some contouring to the face up shape to make information technology more three-dimensional.
Equally you move onto the body, use short strokes to contour the legs, the abdomen, and the rear finish of the king of beasts'southward torso.
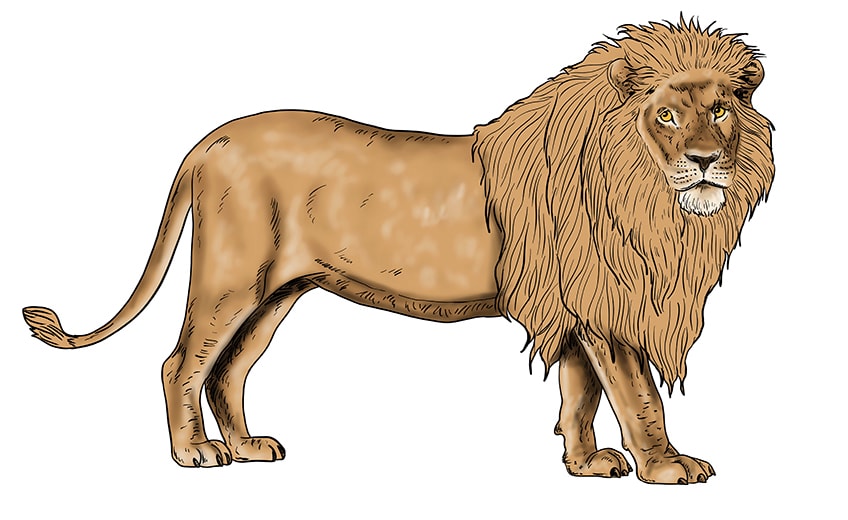
Footstep 12: Adding the First Coat of Color
In order to create a realistic coloring in your lion drawing, you are going to need to build up the color in various layers. To begin with, utilize a light brown or tan shade to color the entire trunk of the lion.
Whichever medium you are using, make sure that you lot create a polish and even coat without any big blotches.
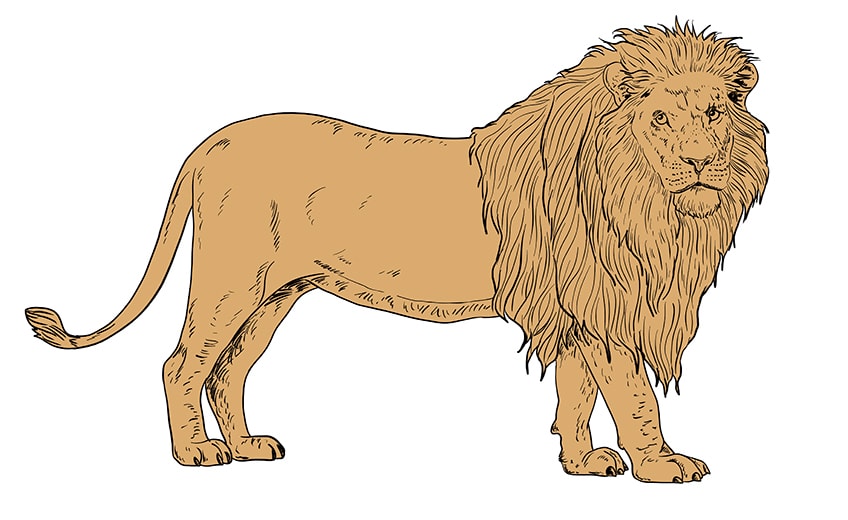
Stride thirteen: Creating Dimension with Shading and Highlights
At present you lot are going to exhale some life into your lion sketch by adding some highlights and shadows. Brainstorm by creating the shading with a touch on of black and a soft brush. Use this black color to shade the frame of the lion, including the upper back, tail, belly, and between all the legs.
For all your shadows, go gently with the black and effort to blend information technology out as smoothly as possible. You tin always add more than shading merely it is incommunicable to take it abroad once it is on.
Add some shading to the facial structure, around the nose, on the forehead, inside the ears, the nostrils, and within the lower lip. To stop this step, utilise a bear on of white paint to create highlight points throughout the body. Focus the white on the lower half of the panthera leo's face, just beneath the optics, on the front of the dorsum legs, and dabbled throughout the body.
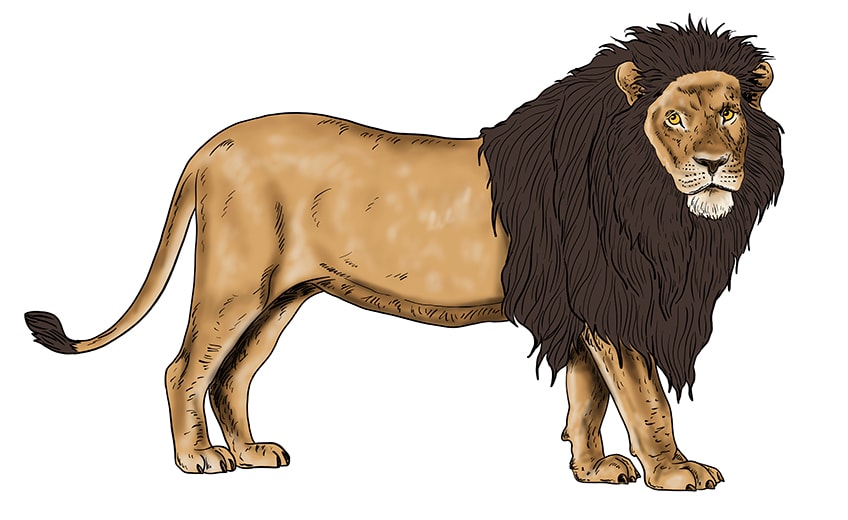
Footstep 14: Painting Details in the Mane
The base color for the lion's mane is a deep chocolate brownish shade. Apply this shade to fill the shape of the mane and to color the tip of the tail.
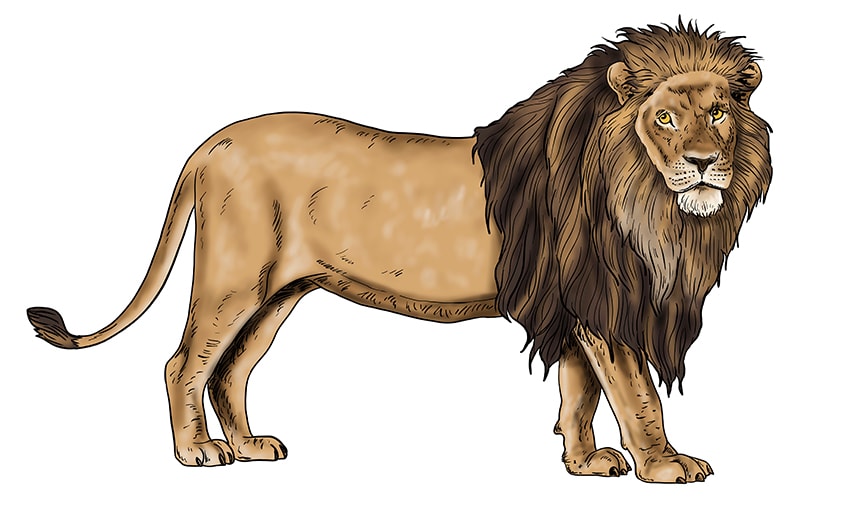
Footstep fifteen: Adding the Final Touches of Highlight
At present that we have the base color of the king of beasts's mane, information technology is fourth dimension to flesh it out with some highlights. Using a pocket-sized soft brush and a light shade of beige, add together a fade to the lion's mane. Beginning at the outer edge of the mane, add more than of the light brown highlight as you get closer towards the king of beasts's confront. Finish the mane highlights by adding a bear on of gray to the mane just below the chin.
You lot tin at present repeat this highlighting process on the small fluffy end of the lion's tail.
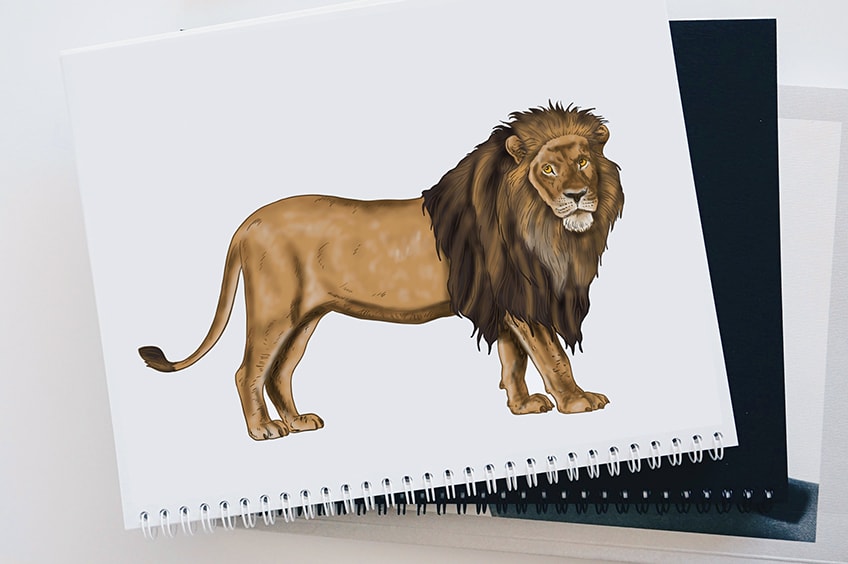
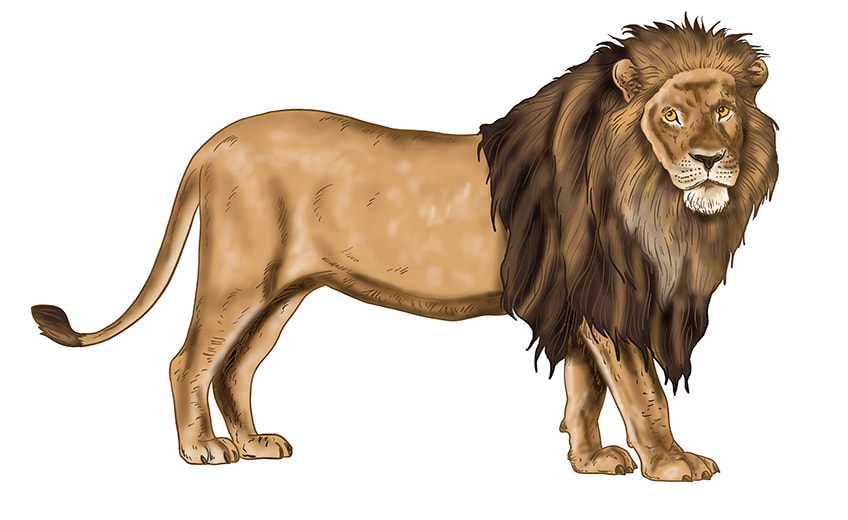
Footstep xv: Finishing Your Lion Drawing
You have almost completed your lion cartoon, and nosotros have come up to the final step. This stride is optional, simply providing a more seamless finished slice. You can reach this past erasing the outlines of your lion sketch. If you are using a drawing tablet, this is very easy for you. If you are using a physical medium, simply use the corresponding shade at each bespeak to trace over information technology.
If you came into this tutorial wanting to know how to draw a king of beasts, we hope to have answered this for y'all. You now know how to draw a lion face and body the easy way and how to create realistic coloring. Hopefully y'all have enjoyed this panthera leo drawing tutorial, and you feel more confident creating realistic lion drawings.
Ofttimes Asked Questions
Will This Tutorial Show me How to Draw a Lion Face?
Absolutely! In our how to draw a king of beasts like shooting fish in a barrel step-by-pace tutorial, we prove you how to construct all parts of the lion's body including the confront and trunk.
Is It Difficult to Draw a King of beasts?
When you first look at the lion, it may seem challenging to draw. When you lot interruption it down and use structure lines, still, information technology is really very like shooting fish in a barrel to create a realistic lion drawing.

Source: https://artincontext.org/how-to-draw-a-lion/
Posted by: deboermosedince42.blogspot.com
0 Response to "how to draw a lion head"
Post a Comment